Steps to create first app in android
How we create first app in Android
So Let’s we
create a Simple project and show
“hello
world”.....
Before creating
a project we have to discuss Project
structure in android studio?
if we create a project or application name is
HelloApplication(mainly
it contains two folder)
Contain two folder
· app
· gradle script(it's not
use for devloper )simple we can say it is for studio purpose
So we discuss
about app(mainly it consist three subfolder)
Contain three folder
·
java (it contains all java files)
·
res (Basically it is stand for Resource)
·
manifest(it
consist one file that name is AndroidManifest.xml)
So we discuss res folder(res stand for resource)
res folder consist many subfolder i show you here
Res folder
·
drawable (it contains all images files which you
want to add in your app)
·
layout (it consist all layout files (Ui Xml files)
·
values (It consist all values files( .xml)
·
raw (consists .mp4,.mp3,.txt,.pdf etc)
·
mipmap (it contains icon of application)
·
anim (it consist animation file (.xml)
like this I
hope it's clear..........
so lets move next....
An android screen consist two files
·
Java(know
as activity)
·
XML(it
contains design part)
we explain here Xml File
it contains Ui Group and Ui Components) So a question
arise here
What is Ui Group
So we can say simply Ui group is like a container
which Contains Ui Components.It also specify in what way Ui Components arranged
here we give Example of Ui Group
ü
LinearLayout
It arrages Ui Components in a vertical or horizontal) I
show you like this
ü
TableLayout
ü RelativeLayout
ü RelativeLayout
ü
ConstraintLayout
üGridLayout
Ui Components
Ui Components
·
TextView (it used to display text on screen)
·
EditText (it used to take inout from user)
·
Button (it used to perfrom some action on click)
·
CheckBox
·
Radio
·
RadioGroup
·
ImageView (It used to show images)
·
ImageButton
·
ToggleButton
·
FloatingActionButton
·
Switch
etc...
So i tell
you how we can create a Xml File
Layout Xml file
a line is appear
deafault which is optional
<?xml
version="1.0" encoding="utf-8" ?> this is known as prolog
then we have to
specify Ui Group
I tell about
LinearLayout
how we define
<LinearLayout
xmlns:android="Xsd_location"
android:layout_width="match_parent"
android:layout_height="match_parent"
andorid_orientation="vertical"
>
///Ui Components
</LinearLayout>
here I tell
which is very important
Every Ui Components and Ui Groups have two mandatory
attributes width and height
Here I tell
you Some Attributes values
match_parent --it's take
full space
wrap_content -- it's take necessary space
dp - specify
the height and width of components or Ui groups
sp -scale
pixels (specify the size of text)
So second
is that is Java file
How we can
create it
Java File
package
packge_name;
public class
class_name extends AppCompactActivity
{
}
here is
OnCreate() which is work a main funtion in c/c++ or like main method in java
the second is that
we have to link
which design or layout we show on screen
so for this
We have to use
one method that is
setContentView(R.layout.xml_file);
it's finish
Steps to
create Hello world app
·
open
you andorid studio
Note:--when you create your first application then you pc
will have to connect with internet.
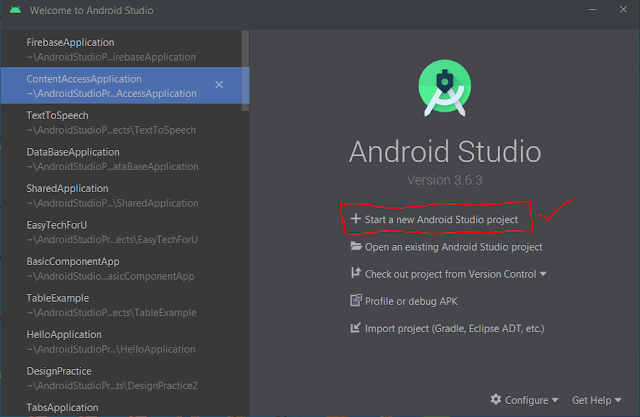
so first screen
appear like this
- Click on Start a new Android Studio Project
The a dialog box apeard as like this
- Then click on next
write here
application name which must be in capital letters So let's wait android studio
create project structure
- Then click on finish and wait upto Gradle sync finished
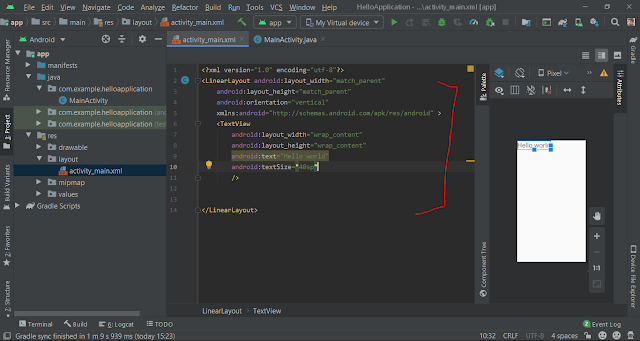
first we delete
all code so we start write code and write following code as shown in picture below.
- Save this code and go to MainActivity file and check layout xml file link or not
Here red box show layout xml connect with our activity..
for beginners it's fine....
so for run this app
Step-1
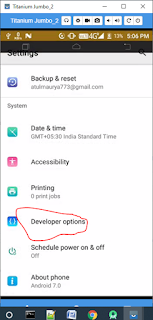
Open you android settings
Step-2
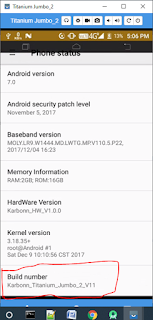
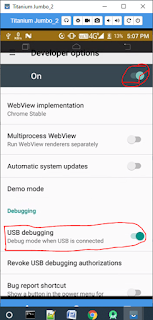
if developer option do not show . then search for build option
- click on Developer option and on usbdebugging mode.
then you can run you app on you real android.
- Here you can say you android name appear here and for run this application click on button
Wait for untill gradle running finished
.........
when gradle running finished then output appear on you real device.
Then we finally create our first app in android studio.
i hope that you will understand easily.








Post a Comment